


Menu
 All Articles
| Submitted By: SenorPablo Date: 09/09/2012 12:00 AM Views: 184 | ||
Bulk Photo File Processing Hi Folks. I thought I would share a very handy little tool I use for processing multiple photos for uploading to the CigarGeeks.com site and Cigar Database. It works just as well and easily for single photos, but the bulk processing makes it a necessity for me.First some background – In order to help keep costs down for the site, I have kept a restriction on images being uploaded to the site at a maximum file size of 100 kb. This helps keep both storage costs and bandwidth costs down. Any modern camera these days will produce photo files with sizes of well over this maximum. So in order to get them to a manageable size for the site it is necessary to use a tool to shrink them down. What I use is a tool called FastStone Photo Resizer. It is supported on MS-Windows OS (sorry Apple Geeks, I'm not sure what works for that platform.) This thing is fast, free, small in size, and well respected in the user community. It also has no baggage like Adware, Spyware, Limited time usage, etc... Here are some additional links for it: Download it here: http://www.faststone.org/FSResizerDetail.htm Read about it here (rated 5 out of 5 stars from CNet Editors and 4.5 out of 5 stars from well over 200 users): http://download.cnet.com/FastStone-Photo-Resizer/3000-2192_4-10319476.html If you decide to go with it, then the rest of this article is about how to use it that will satisfy the needs for our purposes. Note that you only need to go through these few configurations steps once and then the software will remember it for future use. First, I would recommend creating 2 directories somewhere on your computer where you can store the original files from your camera and then the processed file that come out of FastStone. I created directories named "origpics" and "newpics". When you launch FastStone you'll see a window like below. Just select your source directory with all the original pictures ("origpics") on the top left hand side. Then select your output directory where the new processed images ("newpics") will go in the lower right hand side at "Output Folder". You should then be presented a list of your photos. You can either select individual ones to process by highlighting them and clicking the "Add =>" button, or just simply click the "Add All =>" button to add all the photos to the input list. The input list should now contain the full list of images you want to process.  Next, from the main window click the checkbox for "Use Advanced Options (Resize...)", then click the "Advanced Options" button in the lower right side of the main window. It will present the window below. Make sure you are on the first tab labeled "Resize". Click the checkbox labeled "Resize" on this tab. Select "Resize based on one side" from the radio buttons. In the select box "Predefined Side" select the "Height" option. In the "exactly =" field, enter 800 for the pixel size. Leave the rest as is. Click OK to close this window and go back to the main window. NOTE: If you have a camera that takes pictures sideways and requires the image to be rotated 90 degrees to be upright, then there is the second tab here in "Advanced Options" labeled "Rotate" where you can have FastStone do an 90 degree image rotation as well.  Next, from the main window click the "Settings" button next to "Output Format". You will be presented with the window below. The only thing to change here is to change the "Quality" value to "70" by using the slider. All other values can remain at their defaults as shown below ("Color Subsampling" should be set on "High (Smaller File Size)".) Click OK to close this window and return to the main window. 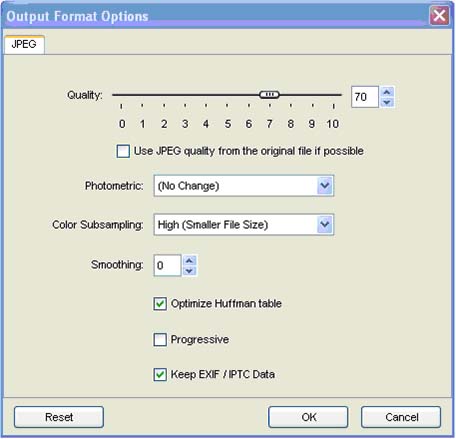 Now, back at the main window, click the "Convert" button and it will go off and convert all the images for you. You'll see a window like below detailing the progress as it runs through all the images. Once complete, you can click the done button. Your new reduced images will be in the new pictures directory ("newpics") and all of them should be less than 100kb and still have a nice quality and size to them. They are ready for uploading to the Cigar Database.  There are plenty of other useful functions on this software, but this is really all you need to do in order to get the basics done for uploading. NOTE: If after doing this your photos are still over 100KB in size, then go back to the "Settings" button next to "Output Format" on the main window and lower the quality level to 60%, etc... |
||
Rating: |
||
|
|
myfirstcigar
Newbie
Send PM Offline Posts: 0 |
11/24/2018 12:00 AM Thanks, I just did my first one, hopefully I got it right. |
|
McBryde
Extreme Expert
Send PM Offline Posts: 3,891 |
01/07/2016 12:00 AM Thanks for this tutorial, it was very helpful! |
|
Fran95
Veteran
Send PM Offline Posts: 238 |
07/28/2015 12:00 AM Thank you this was very helpful. |
|
hebron
Expert
Send PM Offline Posts: 1,487 |
06/01/2014 12:00 AM Thanks for the head-up on this app. I use it for our family gallery, a real time saver  |