


Menu
 All Articles
| Submitted By: SenorPablo Date: 07/04/2019 12:00 AM Views: 1682 | ||
The Wine Coolidor So I felt like I needed to create a little extra room for storing my cigars. I had certainly heard about the coolidor and even helped one neighbor build one. But I really wanted something a little less bulky and that would fit in better with the house. I decided to take a look on eBay for wine coolers as these tend to look a little nicer. I was pretty sure I would be turned off by the price and would wind up making another coolidor, but figure it was at least worth a look.To my surprise there was a guy selling merchandise returns from Best buy. He had a 12 bottle wine cooler still in operating condition for $25. The cooler was an Oster 12 bottle cooler and it measured 10" wide by 24" tall and 20" deep. This is just the right size for what I was looking for. A typical decent Igloo will run at least twice that much so it made sense to me to go for the Wine Cooler. It was a Dutch auction where the seller had 10 of them so it was an easy take. Since it sits in my basement, temperature has never been a problem and I never found the need to plug it in. If you plan to plug it in and have it keep your cigars cool make sure it is a thermo-electric cooling unit. The compressor cooled units are known to create a lot of humidity problems - although some people have made them work.  A week later the unit arrived. It had 5 wire racks held in place by slots molded into the sides of the unit that each held 2 bottles. The first thing I did was remove the 5 wire racks as I knew the slots would provide a perfect way of setting in Spanish cedar shelves. Note: make sure you use Spanish Cedar. Other cedars will impart bad flavors on your cigars. I then took a very mild soap and water solution to wash it out well and help get rid of that fresh plastic smell. I then left it open for a couple of days to let it air out.  Next, was to place an order for some Spanish Cedar shelving from Woodcraft.com. I went with several of the planks that measure 3/8" x 4" x 36". So a week later I received four three foot planks of Spanish Cedar. Opening the box just smelled like a great cedar humidor and got me excited to start cutting is down to fit the wine coolider.  With all the cooling unit in the back the usable depth of the unit was really more about 12 inches. With the planks being four inches wide I decided to have 2 planks per shelf. This would leave a a few inches between the front and rear of the cooler as well as a few inches between the planks of the shelves. I purposely left the extra room so that there was plenty of room for air circulation between the shelves. 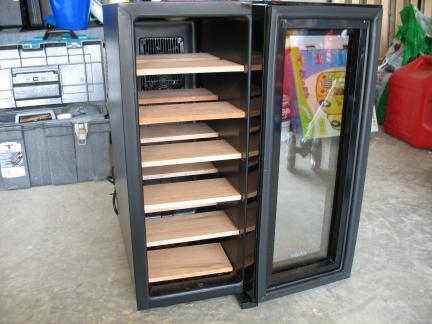 I planned to use the bottom shelf, or floor of the cooler, to put both a Tupperware container of humidity crystals as well as a small fan to circulate the humidity evenly throughout the cooler. For the humidity, I bought 16 OZ of the 65% humidity beads from rhshield.com. This was probably more than I needed but I didn't think 8 OZ would be enough. An Oasis unit could be a nice way to go as well, but I knew that since I'd be keeping it in my basement I'd need something that could draw out the humidity during the summer months when the AC was running, so beads made more sense for me and they work flawlessly.   Air circulation helps keep the humidity even throughout the cooler. Otherwise you would likely have more humid cigars towards the bottom where the humidity crystals sit, and dryer cigars near the top. For this, I planned to buy the Oust battery operated fan. These things are great because they are small, quiet, portable, and run on batteries. They also have a very unique function where they run in cycles for 5 minutes on and then 15 minutes off. The problem I had was that, unbeknownst to me, Oust had decided to discontinue this great product. I searched all over the internet but could not find any place that had them in stock. So I finally went back to the trusty eBay and found them there. I placed the Oust fan (obviously without the scent) facing towards the rear of the cooler, and the humidity crystals in the Tupperware towards the front of the cooler.   The next thing to do was to get some containers for sitting on the shelves to hold the cigars, as opposed to having them sit directly on the shelves. This also would allow me to pull each container out and see the cigars. What could be more appropriate than wooden and/or cedar cigar boxes? I went to my local B&M where they keep piles of these empty things around for sale. Having a good relationship with my local shop, I managed to get them for free. I decided, after looking through the dimensions of all of them, that the empty Oliva boxes would make the best choice.  The last thing I did was let the whole thing sit closed and empty for about a week before loading it up. Now it is loaded and ready to enjoy. Having so much extra room makes it easier to organize my sticks. I can now truly have a "top shelf" selection versus "bottom rack" and whatever other groups make sense in between. Have a look at the pics and send me any questions you might have! Cheers! -Paul (SenorPablo) |
||
Rating: |
||
|
|
johnnyjihad
Member
Send PM Offline Posts: 37 |
12/31/2013 12:00 AM Damn that looks nice. Congrats on it working and the great finds via Ebay. |
|
TatuajeKid
Extreme Veteran
Send PM Offline Posts: 352 |
11/15/2011 12:00 AM Well written and very helpful article. You can buy custom made shelves for almost any wine cooler at wineadors.com |
|
dddddmorgan
Elite Veteran
Send PM Offline Posts: 834 |
08/14/2011 12:00 AM Fantastic idea! So thinking this over, what would stop a person from finding an old refrigerator and doing the same thing? |
|
horrido
Guru
Send PM Offline Posts: 6,209 |
05/30/2011 12:00 AM Very nice articule well done. |
|
grogo67
Veteran
Send PM Offline Posts: 282 |
07/19/2010 12:00 AM That looks awesome! Great job! |
|
SWAT253
Member
Send PM Offline Posts: 26 |
10/30/2009 12:00 AM Nice piece of work! Reckon that re-seller cat has any of those left? |
|
consti
Elite Veteran
Send PM Offline Posts: 832 |
10/27/2009 12:00 AM Wow... That looks amazing. I will eventually do this for sure. Thanks for the step by step photos. |